Implementació d’un esdeveniment sobre el Canvas.
Objectius.
L’objectiu és
- Conèixer i utilitzar els components que ens ofereixen javax.swing i java.awt.
- Implementar un gestor d’esdeveniments que ineteractui amb un usuari.
- Dissenyar una finstra amb Java i amb el gui de Netbeans.
- Ampliar coneixements amb l’implementació d’una pràctica.
Farem els exercicis pasa a pas per tal d’avaluar una correcta construcció. usarem el projecte BouncingBalls actualitzat per tal d’afegir, menus, botons i altres .
Abans implementarem esdeveniments de click damunt el canvas. extret d’un manual que recoman.
Desprès es farà la creació de menús amb l’eina gràfica del Netbeans.
Components awt i swing.
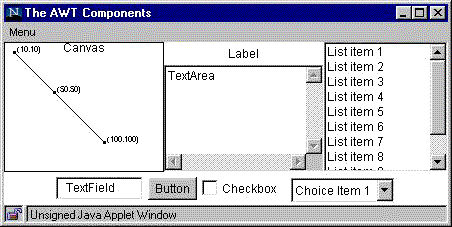
Ja es va exposar a dos posts anteriors, les llibreries de swing i de awt ens ofereixen components per implementar aplicacions amb finestres. Podeu conultar aquest manual sobre el swing.
Els GUI es tenen un funcionament alguns dels components generen esdeveniments.

La primera part és conèixer quins components es poden utilitzar. Components que l’implementen:
- Components de Finestra:
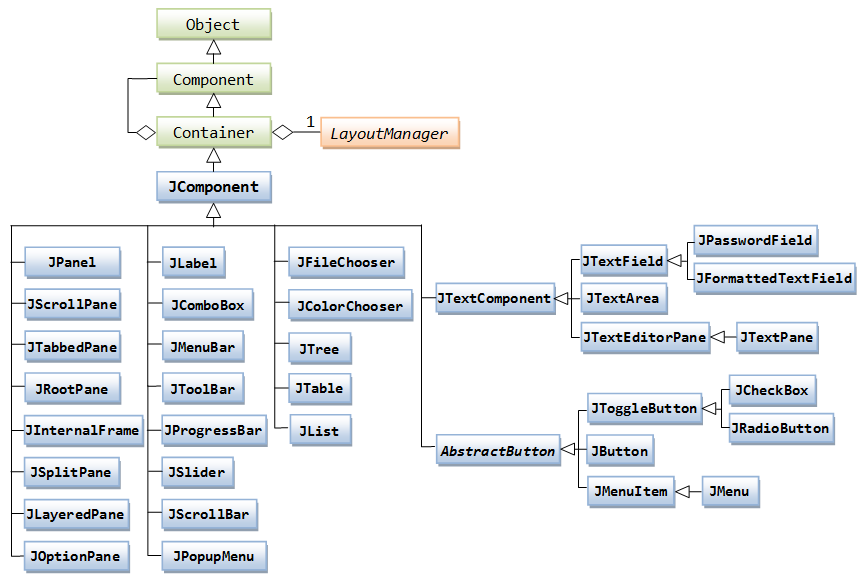
- JFrame: component principal on s’afegeixen tots els altres componets.
- JMenuBar és la barra de Menú, al que s’hi han d’afegir els JMenu, ens crea un menú, al que s’hi han d’afegir, JMenuItem: Cada item del menú. Cridaran a un esdeveniment que podrà executar comandes.
- Contenidors JPanel: components contenidor d’altres components, és molt recomanable usar JPanell per distribuïr els components a la finestra. Al swing tenim altres tipus de contenidors
- Components de control: JButton, JSlide, JLabel, JList, JTextArea, …
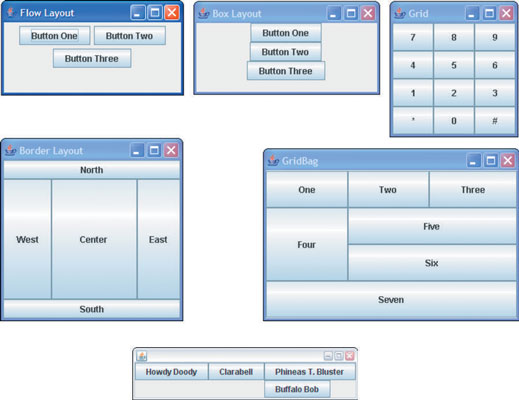
- Dissenyadors: El LayoutManagers, indiquen les possicions dels components a la finestra.
- Control d’esdeveniments: Són implementacions que donen comunicació entre l’usuari i l’aplicació, Permeten controlar esdeveniments i excepcions.


Exercici:
- Implementació de un menú a la nostra finestra que és al canvas. Segueix el
manual per implementar un menú App->quisom que cridi a una finestra d’alterta que posi el teu nom i adreça email.
Disseny de la Finestra.
http://help.eclipse.org/kepler/index.jsp?topic=%2Forg.eclipse.wb.rcp.doc.user%2Fhtml%2Flayoutmanagers%2Fswt%2Fswing%2Fborderlayout.html
Per el disseny de les finestres emprarem els LayoutManagers,que indiquen on es col·locaran els components a una finestra. N’existeixen varies variants, depenent del cas en triarem una o una altra.

Control d’esdeveniments.
Un objecte pot escoltar els succesos dels components implementant una interficie d’ecolta de successos.
L’entorn de treball de swing i alguns dels seus components generen successos i això pot interessar a altres objectes. Existeixen diferents tipus de successos, provocats per diferents tipus d’accions.
- Quan feim click al ratolí o sel·leccionam un element del menú, el component genera un succès ActionEvent.
- Quan feim click o quan es mou genera un MouseEvent.
- Quan tancam o reduïm la finestra es genera un succès WindowEvent.
- …
Qualsevol dels nostres objectes es pot convertir en un esoltador de successos. Quan es posa a l’escolta rebrà la notificació dels successos que està escoltant.
Per exemple, volem implementar que un element del menú de la classe JMenuItem generi un ActionEvent quan sigui activat. Els objectes que vulguin escoltar han d’implementar la interfície ActionListener del paquet java.awt.event.
Hi ha dos estils en la implemenació d’esdeveniments:
- Un objecte escolta els successos de moltes fonts diferents
- Assignam a cada font de successos se li assigna la seva pròpia escolta.
Recepció centralitzada:
Per tal de que un component(per exemple el nostre canvas) sigui un escoltador d’esdeveniments hem de fer
- Declarar a la capçalera de la classe que implementa l’interfície ActionListener.
- Implementar un mètode amb la signatura:
- public void acctionPerformed(ActionEvent e)
- Invocar el mètode addActionListener de l’element del menú per registrar com escoltar l’objecte.
Exercici:
- Volem que a cada click que facem damunt el canvas ens crei una bolla. Aquesta bolla l’ha de col·locar dins la llista d’objectes.
- Segueix les passes:
- a la capçalera de la declaració de la classe canvas afegeix
- public class Canvas implements MouseListener
- La implementació de una interfície ens obliga a crear tots els mètodes que implementa, el Netbeans ens posarà un avís i ens pot generar automàticament tots els mètodes. MouseListener és una interfície que implementa :
- mouseClicked(MouseEvent e)
- mousePressed(MouseEvent e)
- mouseReleased(MouseEvent e)
- mouseEntered(MouseEvent e)
- mouseExited(MouseEvent e).
- Al nostre canvas li hem d’afegir el mètode addActionListener. canvas.addActionListener(this);
- Per crear el canvas ho farem amb el següent mètode:
- public BallDemo()
{
//myCanvas = new Canvas(“Ball Demo”, 600, 500);
myCanvas = Canvas.getCanvas();
}
- public BallDemo()
- a la capçalera de la declaració de la classe canvas afegeix
Aquí baix tens la implemetació sencera sobre el canvas. Afegim la bolla auna llista estàtica anomenada bolles i que ha estat creada per el procès principal. El proces de insertar la nova bolla el feim a la línia 429.
/*
 * To change this license header, choose License Headers in Project Properties.
 * To change this template file, choose Tools | Templates
 * and open the template in the editor.
 */
package balldemo;

/**
 *
 * @author caragoli
 */
import static com.sun.java.accessibility.util.AWTEventMonitor.addMouseListener;
import javax.swing.*;
import java.awt.*;
import java.awt.event.MouseEvent;
import java.awt.event.MouseListener;
import java.awt.geom.*;
import java.util.Random;

/**
 * Class Canvas - a class to allow for simple graphical
 * drawing on a canvas.
 *
 * @author Michael Kölling (mik)
 * @author Bruce Quig
 *
 * @version 2016.02.29
 */

public class Canvas implements MouseListener
{
    private static Canvas canvasSingleton;

    private JFrame frame;
    public CanvasPane canvas;
    private Graphics2D graphic;
    private Color backgroundColor;
    private Image canvasImage;
    private botonera botons;
    private CreaMenu menu;

    /**
     * Create a Canvas with default height, width and background color
     * (300, 300, white).
     * @param title  title to appear in Canvas Frame
     */
    public Canvas(String title)
    {
        this(title, 300, 300, Color.white);
    }

    /**
     * Create a Canvas with default background color (white).
     * @param title  title to appear in Canvas Frame
     * @param width  the desired width for the canvas
     * @param height  the desired height for the canvas
     */
    public Canvas(String title, int width, int height)
    {
        this(title, width, height, Color.white);
    }

    public static Canvas getCanvas()
    {
        if(canvasSingleton == null) {
            canvasSingleton = new Canvas("BlueJ Picture Demo", 700, 600, Color.white);
        }
        canvasSingleton.setVisible(true);
        return canvasSingleton;
    }

    /**
     * Create a Canvas.
     * @param title  title to appear in Canvas Frame
     * @param width  the desired width for the canvas
     * @param height  the desired height for the canvas
     * @param bgColor
     */
    public Canvas(String title, int width, int height, Color bgColor)
    {
        frame = new JFrame();
        canvas = new CanvasPane();
        this.menu= new CreaMenu();
        frame.setJMenuBar(this.menu);
        //frame.setContentPane(canvas);
        frame.getContentPane().add(canvas,BorderLayout.EAST);
        botons = new botonera();
        frame.getContentPane().add(botons,BorderLayout.WEST);
        frame.setTitle(title);

        canvas.setPreferredSize(new Dimension(width, height));
        backgroundColor = bgColor;
        frame.pack();
        setVisible(true);
        canvas.addMouseListener(this);
//        canvas.addMouseListener(this);
    }

    Canvas() {
        throw new UnsupportedOperationException("Not supported yet."); //To change body of generated methods, choose Tools | Templates.
    }

    /**
     * Set the canvas visibility and brings canvas to the front of screen
     * when made visible. This method can also be used to bring an already
     * visible canvas to the front of other windows.
     * @param visible  boolean value representing the desired visibility of
     * the canvas (true or false)
     */
    public void setVisible(boolean visible)
    {
        if(graphic == null) {
            // first time: instantiate the offscreen image and fill it with
            // the background color
            Dimension size = canvas.getSize();
            canvasImage = canvas.createImage(size.width, size.height);
            graphic = (Graphics2D)canvasImage.getGraphics();
            graphic.setColor(backgroundColor);
            graphic.fillRect(0, 0, size.width, size.height);
            graphic.setColor(Color.black);
        }
        frame.setVisible(true);
    }

    /**
     * Provide information on visibility of the Canvas.
     * @return  true if canvas is visible, false otherwise
     */
    public boolean isVisible()
    {
        return frame.isVisible();
    }

    /**
     * Draw the outline of a given shape onto the canvas.
     * @param  shape  the shape object to be drawn on the canvas
     */
    public void draw(Shape shape)
    {
        graphic.draw(shape);
        canvas.repaint();
    }

    /**
     * Fill the internal dimensions of a given shape with the current
     * foreground color of the canvas.
     * @param  shape  the shape object to be filled
     */
    public void fill(Shape shape)
    {
        graphic.fill(shape);
        canvas.repaint();
    }

    /**
     * Fill the internal dimensions of the given circle with the current
     * foreground color of the canvas.
     * @param  xPos  The x-coordinate of the circle center point
     * @param  yPos  The y-coordinate of the circle center point
     * @param  diameter  The diameter of the circle to be drawn
     */
    public void fillCircle(int xPos, int yPos, int diameter)
    {
        Ellipse2D.Double circle = new Ellipse2D.Double(xPos, yPos, diameter, diameter);
        fill(circle);
    }

    /**
     * Fill the internal dimensions of the given rectangle with the current
     * foreground color of the canvas. This is a convenience method. A similar
     * effect can be achieved with the "fill" method.
     * @param xPos
     * @param yPos
     * @param width
     * @param height
     */
    public void fillRectangle(int xPos, int yPos, int width, int height)
    {
        fill(new Rectangle(xPos, yPos, width, height));
    }

    /**
     * Erase the whole canvas.
     */
    public void erase()
    {
        Color original = graphic.getColor();
        graphic.setColor(backgroundColor);
        Dimension size = canvas.getSize();
        graphic.fill(new Rectangle(0, 0, size.width, size.height));
        graphic.setColor(original);
        canvas.repaint();
    }

    /**
     * Erase the internal dimensions of the given circle. This is a
     * convenience method. A similar effect can be achieved with
     * the "erase" method.
     * @param xPos
     * @param diameter
     * @param yPos
     */
    public void eraseCircle(int xPos, int yPos, int diameter)
    {
        Ellipse2D.Double circle = new Ellipse2D.Double(xPos, yPos, diameter, diameter);
        erase(circle);
    }

    /**
     * Erase the internal dimensions of the given rectangle. This is a
     * convenience method. A similar effect can be achieved with
     * the "erase" method.
     * @param xPos
     * @param yPos
     * @param width
     * @param height
     */
    public void eraseRectangle(int xPos, int yPos, int width, int height)
    {
        erase(new Rectangle(xPos, yPos, width, height));
    }

    /**
     * Erase a given shape's interior on the screen.
     * @param  shape  the shape object to be erased
     */
    public void erase(Shape shape)
    {
        Color original = graphic.getColor();
        graphic.setColor(backgroundColor);
        graphic.fill(shape);              // erase by filling background color
        graphic.setColor(original);
        canvas.repaint();
    }

    /**
     * Erases a given shape's outline on the screen.
     * @param  shape  the shape object to be erased
     */
    public void eraseOutline(Shape shape)
    {
        Color original = graphic.getColor();
        graphic.setColor(backgroundColor);
        graphic.draw(shape);  // erase by drawing background color
        graphic.setColor(original);
        canvas.repaint();
    }

    /**
     * Draws an image onto the canvas.
     * @param  image   the Image object to be displayed
     * @param  x       x co-ordinate for Image placement
     * @param  y       y co-ordinate for Image placement
     * @return  returns boolean value representing whether the image was
     *          completely loaded
     */
    public boolean drawImage(Image image, int x, int y)
    {
        boolean result = graphic.drawImage(image, x, y, null);
        canvas.repaint();
        return result;
    }

    /**
     * Draws a String on the Canvas.
     * @param  text   the String to be displayed
     * @param  x      x co-ordinate for text placement
     * @param  y      y co-ordinate for text placement
     */
    public void drawString(String text, int x, int y)
    {
        graphic.drawString(text, x, y);
        canvas.repaint();
    }

    /**
     * Erases a String on the Canvas.
     * @param  text     the String to be displayed
     * @param  x        x co-ordinate for text placement
     * @param  y        y co-ordinate for text placement
     */
    public void eraseString(String text, int x, int y)
    {
        Color original = graphic.getColor();
        graphic.setColor(backgroundColor);
        graphic.drawString(text, x, y);
        graphic.setColor(original);
        canvas.repaint();
    }

    /**
     * Draws a line on the Canvas.
     * @param  x1   x co-ordinate of start of line
     * @param  y1   y co-ordinate of start of line
     * @param  x2   x co-ordinate of end of line
     * @param  y2   y co-ordinate of end of line
     */
    public void drawLine(int x1, int y1, int x2, int y2)
    {
        graphic.drawLine(x1, y1, x2, y2);
        canvas.repaint();
    }

    /**
     * Sets the foreground color of the Canvas.
     * @param  newColor   the new color for the foreground of the Canvas
     */
    public void setForegroundColor(Color newColor)
    {
        graphic.setColor(newColor);
    }

    /**
     * Returns the current color of the foreground.
     * @return   the color of the foreground of the Canvas
     */
    public Color getForegroundColor()
    {
        return graphic.getColor();
    }

    /**
     * Sets the background color of the Canvas.
     * @param  newColor   the new color for the background of the Canvas
     */
    public void setBackgroundColor(Color newColor)
    {
        backgroundColor = newColor;
        graphic.setBackground(newColor);
    }

    /**
     * Returns the current color of the background
     * @return   the color of the background of the Canvas
     */
    public Color getBackgroundColor()
    {
        return backgroundColor;
    }

    /**
     * changes the current Font used on the Canvas
     * @param  newFont   new font to be used for String output
     */
    public void setFont(Font newFont)
    {
        graphic.setFont(newFont);
    }

    /**
     * Returns the current font of the canvas.
     * @return     the font currently in use
     **/
    public Font getFont()
    {
        return graphic.getFont();
    }

    /**
     * Sets the size of the canvas.
     * @param  width    new width
     * @param  height   new height
     */
    public void setSize(int width, int height)
    {
        canvas.setPreferredSize(new Dimension(width, height));
        Image oldImage = canvasImage;
        canvasImage = canvas.createImage(width, height);
        graphic = (Graphics2D)canvasImage.getGraphics();
        graphic.setColor(backgroundColor);
        graphic.fillRect(0, 0, width, height);
        graphic.drawImage(oldImage, 0, 0, null);
        frame.pack();
    }

    /**
     * Returns the size of the canvas.
     * @return     The current dimension of the canvas
     */
    public Dimension getSize()
    {
        return canvas.getSize();
    }

    /**
     * Waits for a specified number of milliseconds before finishing.
     * This provides an easy way to specify a small delay which can be
     * used when producing animations.
     * @param  milliseconds  the number
     */
    public void wait(int milliseconds)
    {
        try
        {
            Thread.sleep(milliseconds);
        }
        catch (InterruptedException e)
        {
            // ignoring exception at the moment
        }
    }

    /************************************************************************
     * Inner class CanvasPane - the actual canvas component contained in the
     * Canvas frame. This is essentially a JPanel with added capability to
     * refresh the image drawn on it.
     */
    private class CanvasPane extends JPanel
    {
        @Override
        public void paint(Graphics g)
        {
            g.drawImage(canvasImage, 0, 0, null);
        }
    }

    @Override
    public void mouseClicked(MouseEvent e) {

      Canvas c = Canvas.getCanvas();
      Random a= new Random();
      Color co = new rColor(a);
      BallDemo.bolles.add(new BouncingBall(e.getX(),e.getY(), 16, co,550,c));

    }

    @Override
    public void mousePressed(MouseEvent e) {
    }

    @Override
    public void mouseReleased(MouseEvent e) {
    }

    @Override
    public void mouseEntered(MouseEvent e) {
    }

    public void mouseExited(MouseEvent e) {
    }
}
Podeu consultar un altre exemple explicat a xtec.
http://aula.gimnesia.net/2018/04/29/implementacio-duna-botonera-i-els-seus-esdeveniments/2on batxilleratObjectius. L'objectiu és Conèixer i utilitzar els components que ens ofereixen javax.swing i java.awt. Implementar un gestor d'esdeveniments que ineteractui amb un usuari. Dissenyar una finstra amb Java i amb el gui de Netbeans. Ampliar coneixements amb l'implementació d'una pràctica. Farem els exercicis pasa a pas per tal d'avaluar una correcta construcció....admin pereantonibennassar@gmail.comAdministratorAula de Informàtica